Showing posts with label tutorial. Show all posts

18.7.12

39 degrees celsius. that's really hot.

Hi everyone! I've got a surprise. It's kind of big news, actually. I was a little nervous about letting you guys all in on this but, hey, I figured why not. So, if you must know.... I've become a DUCT TAPE MUMMY! Mwahhaha. You know... just casually... in my spare time...

Image and video hosting by TinyPic

If you thought to yourself, "Oh, well gosh! Look at that! Lexy! A duct tape mummy!" then I've got yet another surprise for you... TRICKED YA! I didn't really become a duct tape mummy on you! I was just playing a joke on you! I'm so funny! Ha! Hahah!

Ahem. Anyways. I should stop pretending I'm clever and just get to the point. And, the point is, well, I made a dress form out of duct tape! I've wanted a dress form forever to assist me with sewing, but I got bored of looking around and gasping at prices and additional shipping costs. So, at last, I had the brilliant idea... um, I'll make one! I can't believe I didn't think of this earlier - it just seems so obvious. So, a Google search later and BAM! We were ready to go!

Image and video hosting by TinyPic
Fairly attractive process, I'd say. I would highly recommend it to all my single readers lookin' for luvvvv.

It was fairly simple and strait forward. All you need is a baggy t-shirt (hey, dad's bingo shirt!) (which I actually think is cool! shhh...), duct tape, saran wrap, duct tape, a willing helper, and, optional: coloured duct tape for the extra BAM! I was going to post step-by-step tutorial but, let's face it, that would be going above and beyond expectations and, as much as I love you, I have better things to do (i.e. crochet and watch re-runs of modern family). Instead, why don't you just use the link I used? Yeah! Do it!

Image and video hosting by TinyPic


And voila! Some hard-labour (thanks, sibling!), a bit (lot) of sweat, and some awkward fumbling around, we've got our newest girlfrannnd... Here's a bit more about her...


Meet Paulette*. She is somewhat emotionally damaged. People suspect it derives from her unhealthy devotion to iguana themed videos, but this has not been proven. She might just be born a little wack. Like, she just can't help it (iguana videos or not). Still, she's a real riot. She started the "save the glitter" movement in '06 and regularly participates in protests and rallies related to the subject. Her favourite colour is hot pink. Suitably, she is hot pink (her favourite colour). And made of duct tape.
*Note: Paulette may also be Jean-Claude. I haven't decided yet. Jean-Claude is a drag queen. He is especially popular amongst the young, hispanic community. 


I've actually already used Paulette play around with old fabrics to make reversible collars. Wahoo!

Image and video hosting by TinyPic Image and video hosting by TinyPic

They're made from scraps of old projects and clothes (hey, if you stalk my blog hard enough, you may be able to find the original goods!). They're fun. I think. I've worn them. It was fun. I'll post pictures. Okay.

So I hope you're all being snappy and snazzy and stupendous and all those other s-adjectives to make this alliteration thing super! I will talk to you all soon! Let me know what you think! Or don't. Like, I don't care. Pfft. (Praise me! Praise me!)

What is on your summer "to-do" list?

4.7.10

celebratin' da big 100 post with a... ROSETTE TUTORIAL.

Aw yeah. Who's getting excited?! WHO'S GETTING EXCITED?! YOU'RE getting excited! (I feel so camp counselor-esque... Treating you guys like little campers is how I will fulfill the summer camp CIT experience I never had. Boo yeah?!) Anyways, as the title says, it's ROSETTE TIME.

Just some background information on rosettes... I HAVE MADE WAY TOO MANY ROSETTES TO COUNT. To put it eloquently. At least a hundred. You see, I sold them for the Green Fashion Show that I organized and they were a surprisingly huge hit so I made TONS. And, somehow, I still haven't gotten sick of them and made EVEN MORE. Which is a real testament to how awesome they are and how YOU SHOULD DO IT. (Guys, I'd be an awesome camp counselor! Look at that ENTHUSIASM. Can you give a Y? An A? Another Y? YAY!)


(selection of rosette hairclips that were sold)

So, at last, I will now be a good citizen and share my knowledge with the people because my soul is just beautiful and my wisdom must be spread to the kids of the future, the kids of tomorrow and I will now stop talking and move onto the tutorial so YAY.

ROSETTE TUTORIAL

Approximate Time: 10 minutes
Level: Easy (peasy pumpkin squeezy!)

What you need:
- Needle and thread
- Scissors
- Beads or buttons
- Scrap fabric (NOTE: essentially any fabric works for this. However, I've found that thin fabrics - ex. cotton, linen, etc. is MUCH easier to work with than thick fabrics - ex. corduroys, denim, etc.)
- Optional: hair clips, pins, something to embellish (ex. t-shirt)


Step 1:
- Cut your scrap fabric into a circle
- The larger the circle, the larger the rosette
- As a rule of thumb (ie not necessarily accurate and I kind of made it up), the radius (MATH TERM - half the size of the diameter/ circle) will be approximately the size of the final rosette


Step 2:
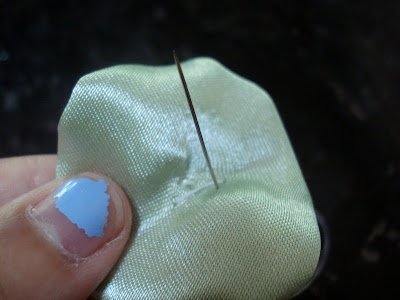
- With a needle and thread, loosely stitch around the circumference (outside) of the circle a few millimeters from its edge
- Make sure the thread is securely knotted at the end


Step 3:
- Gently pull on the needle so that the circle begins to "scrunch" up (kind of like a dumpling! Asian reference.)


Step 4:
- Stitch the centre in place a few times (to prevent fraying and hold it secure)


Step 5:
- Add a form of embellishment to hide the not-so-hot centre
- This can include a single button, a bead, multiple beads, etc.


Step 6:
- Finish it off however you like!
- Step 5 may be the final rosette or you may want to embellish it more, depending on what you'll use it for
- Ex. you may want to add more rosettes and layers (below), sew it onto something as embellishment (ex. t-shirt), or glue gun it to a pin or hairclip (supa cute)
TA-DA!

The beauty of these thingamajigs is that they LOOK complex but it's really like an OPTICAL ILLUSION. They're super simple!

HAVE FUN!
I hope you guys actually try this one because it's REALLY easy. I wouldn't have made over a hundred if it weren't the case. And if you make one... 1) I'd LOVE to see a pictcha and 2) I'd appreciate if you linked back to my blog if you blog about it :). Therefore, make one!

OH, and if there's anyone that gets REALLY into it, PLEASE make this?! It's on my to-do list of things I'll probably never do. But it's BEAUTIFUL. And do-able. And time consuming. And exhausting. But BEAUTIFUL. Hollaaaa!

Chanel Couture 2010, style.com

:)

P.S. Outfit post TOMORROW. I PROMISE. I know it's been awhile and I have now accumulated a small town of photos that will make it onto this blog with time. Amen for good things coming to those that wait. (P.P.S. I don't know if this implies that my outfits are considered "good things" consequently making me sound conceited so to clear the air, I'm not conceited! I just like applying phrases because it makes me sound intellectual and that's always a bonus. iizsmartguyz.)

Kisses.

30.8.09

Puffy Skirt Tutorial: The wait is finally over..


Puffy Skirt Tutorial:
I love these skirts. They are awesomely fun to wear and really versatile. It's really easy to make, especially once you get your first one done. I highly recommend that if you have some fabric, elastic and an hour or two of time, definitely give this a try!

NOTE: You can really change the pattern however you like. I just made this up to suit my preferences, but there is no correct way! Also, I'm not using any technical sewing terms (mainly as I don't know any) so, yeah. Sorry. (But then again, that's what always gets me confused in patterns.. so, maybe my lack of sewing-vocabulary is better?)

NOTE 2: Pretend the piece of paper is fabric - it's mainly to show you where to cut/ sew.

What you need:
- 0.5 yard - 1.5 yards of fabric
- 0.75 inch - 1 inch elastic
- Sewing basics (machine, thread, scissors, pins, etc.)

1. Purchase your material.
Any fabric that is not too thick is suitable for this project. I usually use this cheap cotton that ends up being a few dollars for 1.5 yards. Depending on how puffy you intend your skirt on being, purchase 0.5 to 1.5 yards of fabric. (the more, the pouffier. I usually use 1.5 yards for a very pouffy affect)

2. Cut the fabric in two pieces, lengthwise. I usually to cut on the folded line of the fabric.


3. Make an elastic holder. (Do this to both pieces of fabric)
Pin the top of the fabric down about 0.5 inch. Press (iron).


Remove pins and fabric should remain folded. Pin this fabric down again, about a half inch bigger than your elastic. Ex. the elastic I'm using is 0.75 inch, so I pinned the fabric down 1.25 inch. Press.


Sew along the seam, so the folded fabric remains folded down.


4. Sew fabrics together. Pin the right sides of the fabric (i.e. side that you want showing) together. Sew along the seams, up until the elastic holder.


5. Put in elastic.

Measure the length of the elastic by placing it around your waste. It should be comfortable, but fit snuggly. (Overlap the ends of the elastic.)


Place a safety pin at the end of your elastic and thread it through, bunching the pieces of fabric as you go. Ensure that you pin the other end of the elastic at the end of the skirt's opening (so you do not lose it).


Sew the ends of the elastic together. To ensure stability, you may want to cross stitch it several times.


6. Close the ends of the skirt. Distribute the elastic evenly between the two pieces of fabric (so there is equal bunching all around). Once content, sew the open ends of the skirt (the elastic holder) together. The thread will not show because of the bunching.


7. Hem the skirt. (NOTE: you can hem the skirt however you please - I know that there are many methods. Do as you prefer! I think that this is the easiest one to explain and do.)

Pin the hem (bottom) of the skirt 0.5 inch. Press and remove pins.


Put the skirt on and pin it up at the length that you would like it to be.


Remove the skirt and pin it up at the length that you had pinned. Ensure that the 0.5 inch remains folded (for clean lines). Press.


Sew along the hem.


8. Voila!


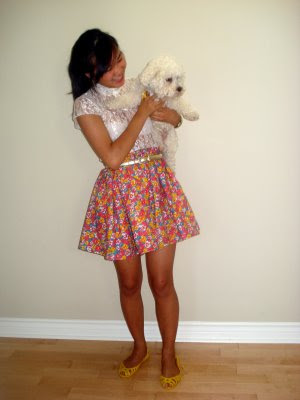
Enjoy your brand-new skirt! :) You can embellish it however you like, or keep it as it is. It looks really cute sinched at the waist with a belt, but maybe you'll find new ways to wear it!

If you have any questions, definitely go ahead and comment and I'll happily clarify any of the instructions. If you do make this (um, I love you!) then please post a picture - I'd love to see the finished result. I personally feel that everyone should enjoy this wonderful experience and should therefore make one.

Have a good day!